Lights
Q: Why won't my USB Headlight turn on when I press the button?
A: All of our high powered USB headlights (300+ lumens) are shipped in lock mode to prevent them from turning on during shipping. In this mode, when you press the button you will just see a flicker of blue beneath the button. To get out of lock mode you must press and hold the button down for 6 seconds (longer than you’d think!). You will then see the light flash a few times and now it will turn on with a simple press of the button. To put the light back in lock mode (to prevent it from accidentally coming on when it’s in a bag) you would need to have the light on and then press and hold the button until the light goes off and continue to hold the button until you see the light flash on/off about 5 times.
Q: How do I open my light to install batteries?
A: Only alkaline battery operated lights are intended to be opened up. Our Dynamo and USB rechargeable lights are sealed to be watertight. If you’ve got a traditional battery operated light and need to change batteries, the process should be fairly straightforward. In general for
tail lights, you need to use a coin (a nickel works well), stick it into the slot on the side or bottom of the light where the two halves of the light meet, and twist.
Headlights require that you unscrew the front bulb portion of the light from the back case where the two batteries are housed. We also have
tutorial videos here. If you’ve got our Spok mini lights
here’s a link to the instruction manual which explains how to change the battery. The
BRT strap video tutorial is here. If you’re still not sure take a look at our
full list of instruction manuals and find your model of light.
Q: How do I install my tail light?
A: The vast majority of our tail lights come with our standard tail light bracket. There are two collars (round bands of plastic) and one mount (which can be attached to either collar using the included screw). The clip on the back of the light is meant to slide into the mount. The collars are intended for two different places on your bike – the large one is for the seat post (you may need to use the included rubber shims to get a snug fit) and the small collar is for the seat stay (the part of your frame that connects near your seat post and also near the axle of your rear wheel). You can screw on the mount to either of these collars. Each collar has an embedded metal nut in which the screw will thread into. You want the screw to go through the side with only plastic first and then into the side with the nut last (so as to adequately hold everything together). Only one screw is included as there is really only a need for one complete bracket – you just need to choose which collar will work best for your bike setup. We also offer a rack mount as well as a rubber strap mount (fits posts up to 34.9mm) and aero seat post mount.
Here’s a link to our tail light instructions. We do also make a
rubber strap bracket which doesn’t require tools and can easily be transferred to another bike. Small parts always ship free too!
Q: How can I mount my tail light to a rear rack?
A: We make a tail light rack bracket that fits all of our tail lights that use a
back clip on the back of them. It is available on our webstore
here and we never charge any shipping on small parts. If your rack needs an L bracket you can find that
here.
If you have a Shiner tail light we make a rack specific bracket for that light which can be found here.
Q: I've got an aero seat post. How do I mount my tail light?
Q: My light doesn't turn on, what's the deal?
A: Open your light and make sure the batteries are aligned correctly to the positive and negative markings inside the light. Also make sure that you have tried a new set of batteries in case the originals are dead. If your light got soaked, take out the batteries and let it dry for a few hours. If that still doesn’t work give us a call (1-866-256-8510) or email
info@planetbike.com and we can help determine what to do next.
Q: My BRT Strap does not turn on consistently. How do I fix it?
A: Sometimes the battery can become unseated from the contacts. First, try pressing the side of the case opposite the red button very firmly with your thumbs to try and pop the battery back into place. If this doesn’t work, open the battery compartment by removing the four small screws and bend the battery contacts towards the battery. View the tutorial video
here.
Q: How should I take care of my rechargeable battery?
A: The expected battery life is 500 charge cycles and the capacity/run time can be reduced over time. Lithium ion batteries can lose a charge over time so charge before riding if the light has not been used recently. You should never store your light with a dead battery and charge the light after each ride for best results. If the light is stored long term it’s recommended to charge the battery every 3 months.
Q: How do I get my headlight attached to my handlebar?
A: Most headlights come with our
Quick Twist bracket. We also offer a similar
Quick Strap headlight bracket if you have a wider bar or prefer a rubber strap attachment bracket. The Quick Twist bracket is adjustable and should fit securely to all handlebars 31.8mm or narrower. Between adjusting the plastic band (by choosing the correct setting for your bar diameter) and the thumb screw you should be able to get a good snug fit on all handlebars.
Here’s a link to the instructions as well as a
video tutorial.
Q:
My light worked for many years but it's reached the end of its life. How should I dispose or recycle it?
A: If your light is past its useful life and no longer working as it should, please attempt to recycle it with a local electronics recycling facility. Go to
Call2Recycle.org for more information on electronics recycling.
Fenders
Q: How do I replace my mudflaps?
A: We sell a bunch of small parts in the Service Parts section of our webstore and we never charge any shipping on small parts. We offer Hardcore, ReCycle, Cascadia, Cascadia Recycled, and Cascadia ALX models of mudflaps and widths ranging from 35mm to 65mm. First, measure straight across your fender (edge to edge not considering the curve) to be sure you order the right size.
To remove the old mudflaps drill them out from the bottom (make sure to remove the wheel!). Use a bit that is large enough to grind away the outer edge of the underside of the rivet – a 7/32 should do the trick. Drill until the washer frees loose and perhaps a bit more so that the entire outer edge is gone. Then using a flat head screwdriver from the top of the fender, pry out the top of the rivets. Once they’re out the old mudflap should slide off the fender and you should be left with two clean holes (you should never have to actually drill through the plastic fender).
Slide the new flap on and use the included snap rivets to secure them to the fender. Make sure you hear the pieces snap together to ensure they’re connected.
Q: My bike has disc brakes and I want full coverage fenders - which ones should I get?
A: The only full coverage fenders we recommend for bikes with disc brakes are our Cascadia models. We offer these fenders in both aluminum and polycarbonate options in a variety of wheel/tire sizes. Go to our main fender page and select the size specs you need and look for the Cascadia options. These fenders all come with disc compatible stainless steel hardware. All of our Cascadia fenders require that your bike have the mounting holes on the frame/fork of the bike to install them. We do offer a 700 x 35mm fender size of SpeedEZ fenders which use rubber footed brackets to secure the fender with rubber straps (for tires up to 25c). Here's a link
Q: Will my bike still fit on my car rack with fenders installed?
A: In general we don’t recommend leaving fenders on bikes that will be transported on a car. Driving at highway speeds may cause breakage due to the high wind force causing the fenders to vibrate dangerously. If you are unwilling to remove fenders we recommend using some sort of straps to help secure the fenders to the bike to prevent them from moving and potentially breaking. We do not offer warranty coverage on fenders that have been damaged as a result of being transported on a vehicle.
Most bikes will still fit on roof racks with fenders installed. Newer platform hitch racks use ratcheting arms that press down against the wheels and fenders can impede the function of these arms. It is not recommended that a bike with fenders be transported on this style of rack.
Q: Modifications: Can I paint my fenders? Drill holes in them? Cut them in half?
A: We can’t tell you what you can and cannot do, but we never recommend any modification to our products (doing so will void all warranty). If you chose not to take our advice, please be forewarned that modifications might compromise the products structural integrity. We will not be responsible for modifications gone awry.
Computers
Q: Sometimes my computer resets itself when I am riding, or when I take it off of the mount. What's up with that?
A: It sounds like there isn’t solid contact between the battery and the contacts. Remove the battery and bend the contacts located below and to the side of the battery in towards where the battery sits. There are two battery terminals – a flat one that is easily visible on the back of the circuit board and a small bent one on the edge of the battery compartment. If this is indeed the problem the likely culprit is the terminal on the edge.
Q: Why doesn't my mode button work?
A: Usually if the mode button does not work it is because one of the red buttons is slightly stuck inside the case. The best way to fix this is to use either a small screwdriver or an unbent paperclip and gently pry the red button back towards the center of indentation where it sits. The button should pop back into place and appear flat within the computer case.
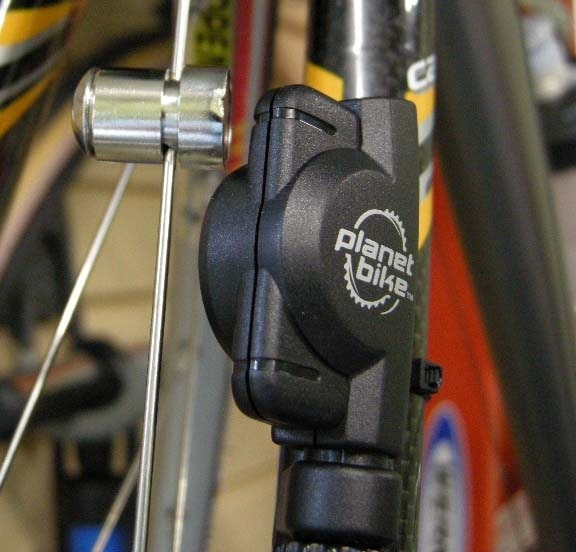
Q: Why does my LCD screen show the time, but won't register speed when I ride?
A: The sensor and the magnet must be within 5mm. The magnet must also be aligned with just ONE of the round dots (lines on the Protege 9.0 wireless) on the sensor. These are located at the top and bottom of the sensor. Pick one of these and DO NOT align the sensor between the round dots or lines as the computer head will not properly register the signal. Here is a photo for reference:

On the Protege 9.0 Wireless computer, make sure the sensor is within 21 inches of the computer head. It’s also possible you need to change the battery. The battery in the computer head should last approximately 6 months or 1500 miles (depending on usage and more like 2500 miles for the wired computer). The battery in the sensor (for wireless computer ONLY) should last twice that long. The time will still be displayed in a computer that has a weak battery – there’s just not enough voltage for it to pick up the sensor signal.
Q: Why is the screen unreadable with my sunglasses on?
A: If you wear polarized sunglasses you may not be able to read the screen or a small dark spot may appear on the screen. This is because we already polarize our screen for easier reading and the double-polarization effect can obscure the data on the screen.
Q: Can I buy a stem mount for my computer?
A: We offer a universal bracket for our wireless computer which allows the bracket to be configured for either a handlebar or a stem with a simple adjustment using a screwdriver. This bracket uses zip ties to secure it to whichever location works best on your bike setup. We sell the universal bracket separately on our website and shipping is always free on small parts.
For the time being our wired computers can only be mounted on a handlebar.
Q: Can I use my computer on a trainer?
A: Generally our computers are designed to have the sensor and magnet set up on the front wheel. Most trainers have the front wheel sitting stationary and thus you’d have to remount the sensor and magnet to the back wheel if you want to use them on the trainer.
We don’t recommend doing this with our wireless computer as the maximum distance range between the computer screen and sensor is 21″. Our wired computers come with a standard wired sensor bracket that is 86cm long and likely can’t be wired to the rear wheel. We do offer two longer wired mounts – our rear wheel mount is 130cm and our tandem mount is 160cm. We sell these on our website and never charge any shipping on small parts.
Q: How do I change the time on my computer without resetting the entire computer?
A: Push the mode button (silver button on the back of the computer) until you see the time displayed on the bottom line of the computer. Push the red set button on the back of the computer (upper left). On the screen the hour digit should now be flashing. Push the mode button to get to the correct number and push the set button to choose the hour and move on to the minute digits.
Q: I'm having a hard time removing my computer from the bracket - help!
You remove the computer by pushing it out of the bracket towards the saddle of your bike. By design the mount is meant to securely attach the computer so that the computer does not pop off while riding but sometimes the molding is a bit tighter than intended. Admittedly you need to exert a fair amount of force to get the computer off.
Grip the handlebar while facing the front of the bike (looking towards the saddle and back wheel) and using both thumbs push the computer straight out (parallel to the ground or to the bottom of the bracket) without pushing up or down. A small screwdriver can also be used to pry the computer out of the bracket – just stick it between the computer and the bracket at the top of the computer and use it as a lever by pulling the end of the tool from a horizontal to vertical position.
Pumps
Q: Why does air come out the wrong hole in the pump head when I am pumping?
A: Sometimes the mechanism inside the head that automatically switches to the correct hole gets stuck. You can try striking the pump head against a hard surface to loosen things up. If that doesn’t do it we do sell replacement pump heads on our website and never charge any shipping on small parts. Here’s a link to the
dual head and here’s a link to the
auto head – they are interchangeable and work with virtually all models of pumps we’ve ever offered (the Air Supreme is the only exception). If the head fails within the first year or two we’ll replace it under warranty (email us at warranty@planetbike.com). Otherwise normal wear and tear can mean you may need to replace them every so often.
Q: What if the seals on my pump hose or head wear out?
A: Our pumps are all rebuildable. You can purchase replacement parts
here.
CO2
Q: Will your CO2 cartridges work with other manufacturers' inflators?
A: Yes, in most cases. Our cartridges are tested to the highest standards for durability, safety and reliability. They contain pure CO2 with no oils or contaminants. Please note, if you use a Genuine Innovations inflator that accepts non-threaded CO2 cartridges, you must use Genuine Innovations non-threaded cartridges. Planet Bike threaded cartridges are compatible with G.I. threaded inflators.
Q: What can I do with my CO2 cartridges when they're empty?
A: Recycle them! They are steel and 100% recyclable. Check your local recycling facility’s guidelines – you may be able to throw them in your curbside recycling or you may need to drop them off.
Locks
Q: I forgot the combination on my lock. Is there a master code that will open it?
A: No, there is no master code. All locks are set to 4 dashes from the factory so if you’re not sure if you ever set the code try that to see if it works. You can set your own code by following
these instructions.
Q: How can I order replacement keys?
A: To order replacement keys:
1) We need to know the number on the key.
2) We need to know what lock it came from.
3) We need a photo of the key for manufacturing reference.
4) Cost is $4 per key and takes about 6-12 weeks to manufacture (we only receive 4 shipments a year of replacement keys)
5) We need your name, address and phone # for shipping, as well as credit card info for payment.
Q: Can I buy several locks that all use the same key?
Racks and Bottle Cages
Q: Will the EcoRack fit my bike?
A: Our Eco rack fits most bikes that don’t have disc brakes. You will want to make sure that your bike has the predrilled eyelets on the frame of the bicycle so that you can attach the rack. These holes are near the rear dropouts (where the rear wheel rests in the frame of the bike). There may also be holes on the seat stays (the pieces of the frame that extend below the seat post to near the rear axle of the wheel). We do include a pair of
rubber coated P clamps that can be used around the seat stays if your bike does not have mounting points at these locations. If you have a small bike or a bike with a long wheel base it’s possible you may need to purchase the
extra long upper mounting stays (15″) which we have available on our website and shipping on small parts is always free.
Q: What rack should I get for my fat bike?
A: Our
Versa rack has been successfully mounted up to many brands of fat bikes. The beefy spacing on the rack (8″ between the lower legs) provides ample space for big tires and the rack comes with
disc brake compatible hardware. The Versa comes with two sizes of upper mounting brackets and it’s possible you’ll need to use the
extra long upper stay to get a good fit.
Q: How do I mount a water bottle cage?
A: Our cages come without any mounting hardware as these parts are generally already installed within the holes on the bicycle. Bikes usually offer one or two water bottle mounting locations depending on the size of the bike. Small bolts should already be installed in these holes and to install the cage simply remove them, line up the cage (the spacing of the holes is standardized) and tighten the bolts back down.
Advocacy
Q: Where do the 1% for the Planet contributions go?
A: Since our start in 1996 we have donated over 2 million dollars to various organizations working for sustainable transportation solutions. In 2016 we became members of 1% for the Planet and commit to donating 1% of our annual sales to groups working to benefit the natural environment. To see a complete listing of organizations we are members of and those that we donate time, resources, and profits to take a look at our Pledge Page.
Q: Do you still offer free shipping to members of bicycle advocacy organizations?
A: Yes. We think becoming a member of a bicycle advocacy organization is an important step in improving conditions for cyclists and increasing overall participation of cycling. We are happy to offer free standard shipping to members of any bicycle advocacy organization. Use the coupon code ADVOCATE and be sure to list your group affiliation in the notes section of the order. Please note that this offer is only for customers in the lower 48 US states.